This menu is only active when a table is selected. For a general presentation of the tables, refer to the the section called “Tables”.
- Set Column as
-
These commands are used to define the kind of data which is stored in the different columns of a table. They can also be accessed with the right mouse button when a column is selected in a table.
- Set Column as→X
Define the selected column as abscissae for the plots. You can define more than one column as X-values in a tables, they will be referenced as X1, X2, etc.
- Set Column as→Y
In the case of 2D plots, this command defines the selected column as Y-values for the plots. In the case of 3D plots, Y columns can be used as the second abscissae.
- Set Column as→Z
In the case of 3D plots, Z columns will be used as plotted values.
- Set Column as→X Error
Define the selected column for use as error bars width for abscissae. Note that the column is not related to a specific X column, you will have to specify the link to specific X values when the plot will be built.
- Set Column as→Y Error
Define the selected column for use as error bars for Y-values. Note that the column is not related to a specific Y column, you will have to specify the link to specific Y values when the plot will be built..
- Set Column as→None
The selected column can be used in different ways in several plots (as X values, Y values, etc).
- Fill Selection With
-
This command is used to fill the selected column with special values. It can be applied to a limited selection of cells. These commands does not assign formulas to cells, they just fill in the cells with values.
- Show Comments
If you select this command, the Comment field of the columns will be shown under the names of the columns. The name of the command will then change to hide comments. This command applies only to the selected table. See the the section called “Tables” for more details.
- Hide Controls
If you select this command, the Parameters part of the table will be shown. The name of the command will then change to hide controls. This command applies only to the selected table. See the the section called “Tables” for more details.
- Formula Edit Mode
If you select this command, the formula used in the different columns of the table will be shown. This command applies only to the selected table. In this mode, the formula assigned to each cell can be viewed and edited. This allows to use different formulas on each row of a column. Then, you can switch back to the normal mode and used the Recalculate command to view the numbers resulting from these formulas.
- Edit Column Description
This command is just a shortcut to the Description tab of the table. See the the section called “Tables” for details.
- Change Type & Format
This command is just a shortcut to the Type tab of the table. See the the section called “Tables” for details.
- Clear Table
Removes all the values of the selected table. There is no confirmation window for this command, but you can use the Undo command to cancel.
- Sort Table
-
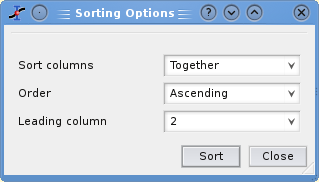
This command is used to sort the table. If you choose the option separately, only the selected column is sorted. If you choose together, all the columns are sorted based on the specified leading column.
- Assign Formula
-
This command is used to fill the selected column with the values resulting from a mathematical formula. This command will open the Formula tag in the properties dialog of the selected table.
The available mathematical functions (assuming you are using the default scripting language, muParser) are listed in the the section called “muParser”. The special function col(x) can be used to access to the values of the column x, where x can be the column's number (as in col(2)) or its name in doublequotes (as in col("time")). You can also get values from other tables using the function tablecol(t,c), where t is the table's name in doublequotes and c is the column's number or name in doublequotes (example: tablecol("Table1","time")).
The variables
iandjcan be used to access the current row and column numbers. Similarly,sranderrepresent the selected start and end row, respectively.Using Python as scripting language gives you even more possibilities, since you can not only use arbitrary Python code in the function body, but also access other objects within your project. For details, see the section called “Python”.
If you make some changes in the table, the values are not computed again. You have to explicitly tell SciDAVis to recalculate individual cells or whole columns or rows by selecting Recalculate command from their context menu or pressing CTRL+Return.
- Recalculate
When you fill a column (named for example 'C1') with the results of a formula (by using the Assign Formula command), the values of the column are calculated only once when you define the formula. If your formula depends on values of another column (name for example 'C2'), the values of 'C1' are not updated if you modify the values in 'C2'. This command is used to recalculate the values of the selected column.
- Add Column
Adds a new column in the table. Whatever the selected column, the new one will be inserted at the right of the table after the last column. If you want to insert a column between two existing ones, select the column and use Insert Empty Columns from the context menu. A new column will be created on the left of the selected column.
- Dimensions
-
Allows to define the number of columns in the table. Be carefull if you decrease the number of columns in a table, a number of columns will be removed and the data will be lost.
Allows to define the number of rows in the table. Be carefull if you decrease the number of rows in a table, a number of rows will be removed and the data will be lost.
- Go To Cell
Defines the active line in the selected table.
- Export Ascii
-
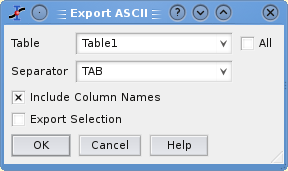
This command can be used to export the selected table to an ascii text file. If you check the option All, you will have to choose a directory in which one text file will be created for each table, the name of the files being the one of the tables.
- Convert to Matrix
This command is used to convert a table into a matrix. It is mainly used to import data from files: the first step import data in a table, and the second one is the conversion of the table in a matrix.

